3. Translate customizer settings with the WPML plugin
4. Add video as background in Elementor
5. Logo does not show up on my site
6. How-to: Update the theme
7. Set up the WP Mail SMTP plugin
8. Enable Header / Footer Builder
1. Theme Demo Images
Due to copyright of the images used in our theme demo we can't distribute them within the theme. Below you'll find a list of all images that can be purchased from 123RF.com
Sometimes, the contact form might not send your message, and you'll see a red error notice appear below the form after clicking the submit button. This is a common issue with WordPress contact forms and can usually be resolved by installing the WP Mail SMTP plugin.
Before installing the plugin, please go through these steps first:
1. Go to the "Contact" tab in the admin menu and edit your contact form
2. Click on the horizontal "Mail" tab
3. At the "To" setting enter your email address like:
4. At the "From" setting enter the same email address, but wrapped within < > symbols, like:
Please see the screenshot below for step 2, 3 and 4
5. Save the settings and test if the contact form send out the messages successfully.
If the contact form still don't send out the message the mail server of your domain is most likely blocking the requests and a secure connection is needed, this is one of the most common issues with contact forms and WordPress.
You can do this by installing and setting up the WP Mail SMTP plugin. After installing the plugin please follow the steps in the article link below:
3. Translate customizer settings with the WPML plugin
Make sure to have the WPML String Translations plugin installed.
--
1. Go to WPML -> String Translations
2. Click the "Translate texts in admin screens" link at the bottom of the page
3. Scroll to the "+ theme_mods_NAME" link and click on it (where NAME is the theme name)
4. Check the checkboxes of the "featured_button_text" and "featured_button_url" settings
5. Scroll to the bottom of the page and click the "Apply" button and wait till you see the success notice.
("featured_button_text" and "featured_button_url" can be replaced with any other setting you want to translate from the customizer)
6. Go to WPML -> String Translations again
7. You'll find 2 new rows in the "admin_texts_theme_mods_NAME" table (where NAME is the theme name).
If you don't see them in the list click on the "All Domains" dropdown field and select the settings from there.
8. Click on the translation link of each new setting and the field to translate will appear.
4. Add video as background in Elementor
In Elementor Page Builder you can add a video (YouTube / MP4) as background on the following way:
Edit your page with Elementor
Add a new page builder row at the top of the page
Edit that new page builder row
At the height setting choose "Min Height"
Change the height value to your own needs
Enable "Stretch Section" setting
Click image below to see step 2 till 6
Click on the "Style" tab
Select the video icon at the background setting
Paste a YouTube video URL in the video link setting
5. Logo does not show up on my site
The issue is related to your WordPress installation not being configured yet for a HTTPS connection. Therefore the logo will show up as a broken image if you access your website over HTTPS.
You can fix this by following these steps:
Go to Settings → General on your dashboard
At the "WordPress Address" and "Site Address" settings change the URL prefix from HTTP to HTTPS
Save the settings at the bottom of the page
Navigate to the logo setting under Appearance → Customize → Theme Options → Logo & Site Icon
Delete the logo from the setting(s) and re-select your logo from the media library
Save the settings
Now your logo should be visible, let me know how this goes.
6. How-to: Update the theme
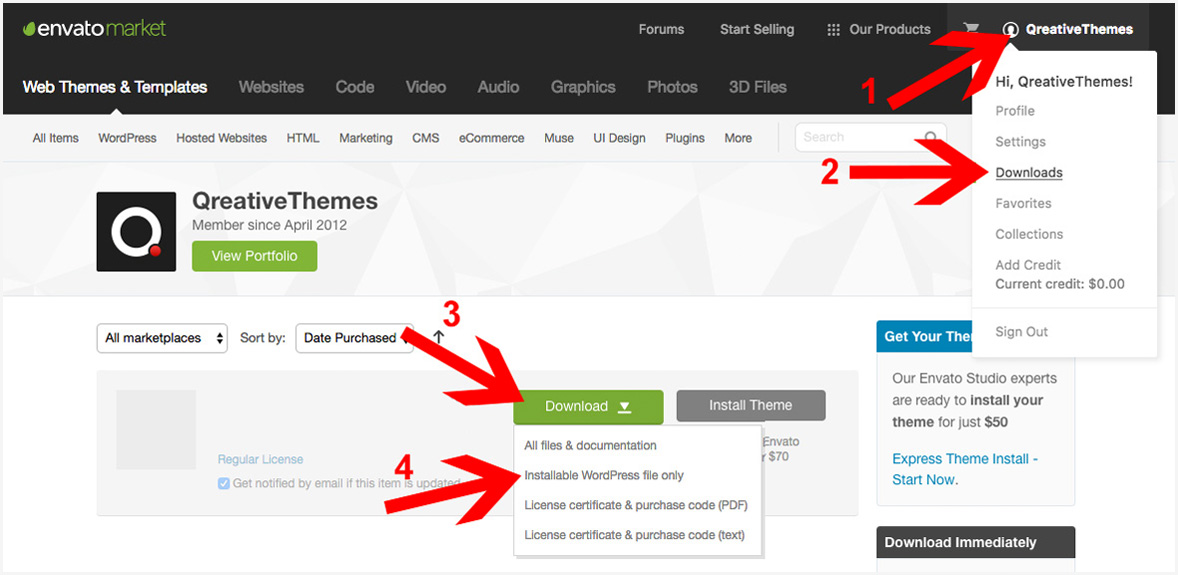
Download the latest theme version
You can download the latest available theme version from the download page of your ThemeForest. Click the "Download" button and select "Installable WordPress files only" for the submenu.
* Before updating the theme it is recommend to create a backup of your website with a plugin like UpdraftPlus.
Follow the steps in this article to setup the plugin
2. WordPress Dashboard
Navigate to Appearance → Themes
Click on "Add New" at the top of the page
Click on "Upload Theme" at the top of the page
Upload the theme .zip file (see screenshot above for the right .zip package)
Click on the blue button to replace the current theme
The theme has been updated
3. FTP Client
Login to your server with a FTP client
Navigate to the theme folder in your WordPress installation (e.g. wordpress/wp-content/themes/)
Rename the folder of the theme you're currently using (e.g. theme-name1 or theme-name2)
Unzip the downloaded zip file and upload the folder to the themes folder on your server
Check if everything is working correctly
If you have any translation files in the old theme folder copy them over to the new theme folder
Remove the old theme folder from your server
The theme has been updated
7. Set up the WP Mail SMTP plugin
Before going through the steps make sure you have installed and activated the WP Mail SMTP plugin and have the following details at hand:
- SMTP Host - SMTP Port - SMTP Username (the email address that is used in the contact forms on your website) - SMTP Password (password of above email address)
The SMTP Host and Port details can be found in the email you should have received from your hosting provider.
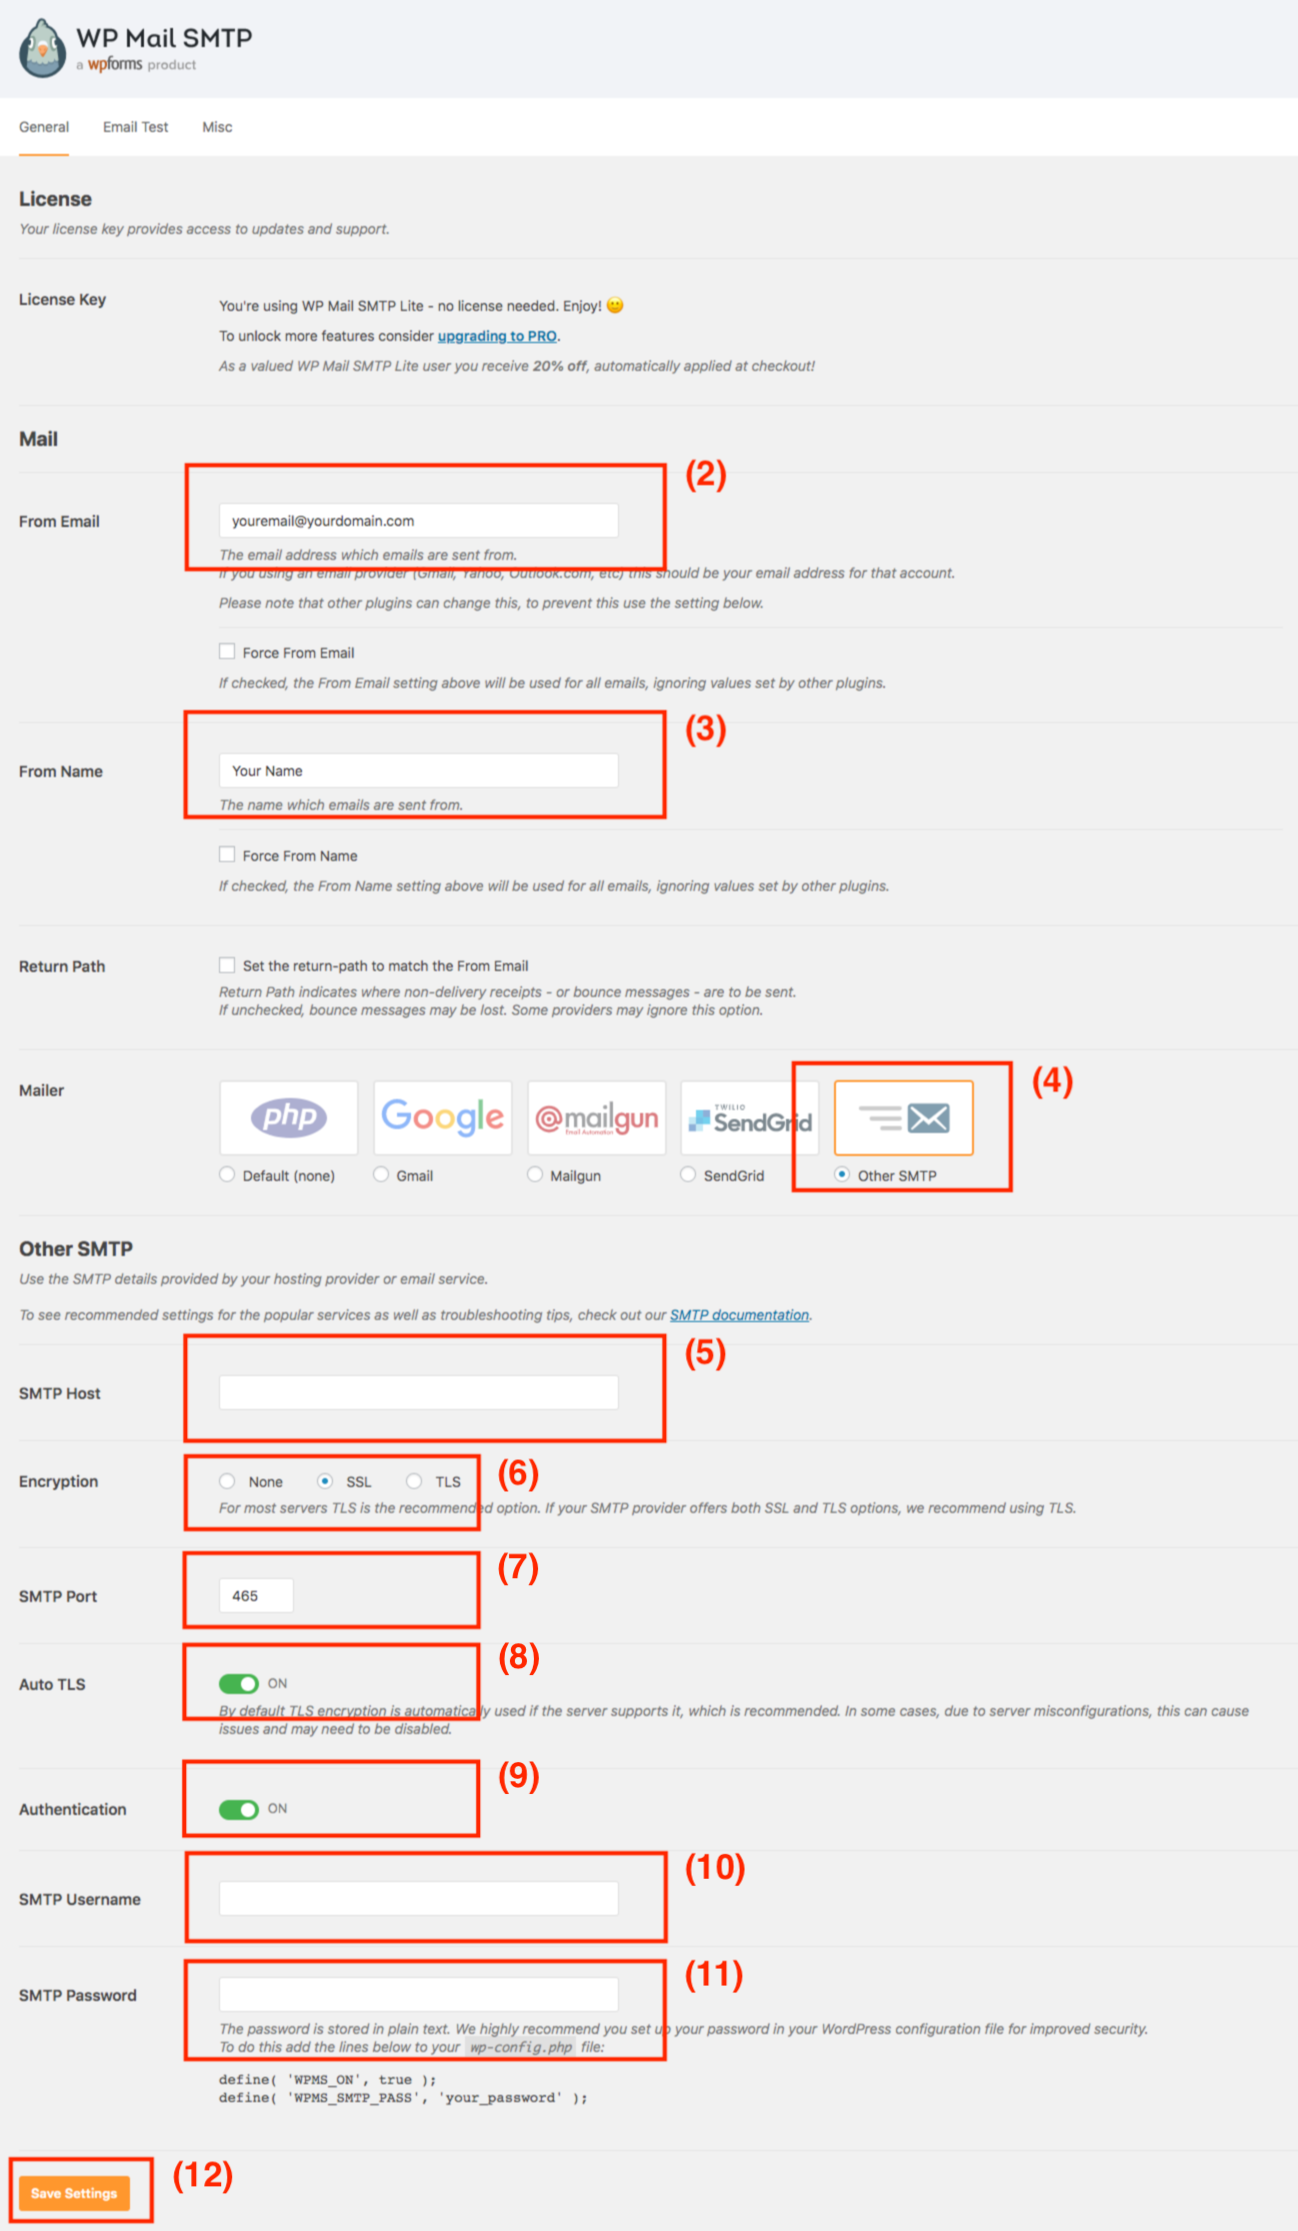
Configure the WP Mail SMTP plugin (step by step)
1. Navigate to the "WP Mail SMTP" tab in the admin menu
2. At the "From Email" setting enter the email address that you're using in your forms
3. At the "From Name" setting enter the name which emails are sent from
4. Select the "Other SMTP" option
5. Enter the SMTP Host (can be found in an email from your hosting provider)
6. At the "Ecryption" setting select "SSL" (select "TLS" if SSL is not available).
7. Enter the SMTP Port (can be found in an email from your hosting provider)
8. Set the "Auto TLS" setting set to "On"
9. Set the "Authentication" setting to "On"
10. Enter the SMTP Username (the email address you're using in your contact forms)
11. Enter the SMTP Password (the password of the email address)
12. Save the settings
Click to enlarge image
At this point the contact forms should be working. Note that a delay in sending and receiving the message is possible, this depends on the mail server of your domain.
If you still experience any issues please open a support ticket and we are happy to help you.
8. Enable Header / Footer Builder
To create a header or footer by using the Elementor page builder you can use the Elementor PRO version which is compatible with the theme.