In the theme customizer you can change the fonts of the theme. The options can be found via Appearance > Customize > Theme Options > Typography
If you want to target elements specifically or need more advanced typographic controls please install the Easy Google Fonts plugin.
The plugin will add a Typography panel to the root of the customizer (Appearance > Customize). Here you can change the font for headings and content of the theme.
To change the font for specific elements in the theme you need to setup 'custom font controls'. To do this please follow the steps below:
1. Navigate to Settings -> Google Fonts 2. Create a font control. For each font control please enter a reference name, CSS class and click the 'force style' overwrite checkbox. Below you can find the CSS classes for custom elements:
Navigation - Enter the name 'Navigation' - Add CSS class .main-navigation li a
Call to action title - Enter the name 'Call to action title' - Add CSS class .cta-banner.cta-block .cta-banner-text .cta-banner-title
Testimonial author title - Enter the name 'Tesimonial author' - Add CSS class .testimonials .testimonial-person .testimonial-author
3. Please navigate to Appearance > Customize > Typograpghy. You will see 2 panels. In the 'Default Typography' panel you can change the content headings and fonts. In the 'Theme Typography' you will find your custom font controls.
3. Translating the theme
You can translate theme text strings (for example the weekdays) on two different ways:
1. Translate theme language file
You can translate the theme by editing the included .pot language file with a program like PoEdit. After translating please export the .po and .mo files which you need to upload in the language folder of the theme (theme-folder/language/).
With the Loco Translate plugin you can translate the theme inside your WordPress installation.
Please install and activate the Loco Translateplugin and follow the steps below:
1. Navigate to Loco Translate -> Themes (to translate text from a plugin go to Loco Translate -> Plugins) 2. Click on the theme or plugin in the list that you want to translate. 3. Click on the "New Language" link 4. Set your language from the dropdown field 5. Set "Choose a location" to Custom and press the Start Translating button 5. Type the word you want to translate in the search box and click on it when it appear in the list below 6. Write your translation in the most bottom textarea (do not change the default text) 7. Save the settings 8. Navigate to Settings -> General and set the "Site Language" option to the translation language.
You can read this tutorial for more information how to set-up a new translation (screenshots included)
4. WPML translate customizer field
Text fields from the theme customizer can be changed on the admin string translation page of WPML to enable the translations.
Make sure you have the WPML main plugin and WPML String Translation add-on plugin installed on your website.
In the steps below we translate the Gallery Page Title setting from the customizer. If you need to translate a different setting from the customizer you can follow the same steps but in step 3 you need to select that field instead of the gallery title.
1. Navigate to WPML -> String Translations and click "Translate texts in admin screens" text link at the very bottom of the page (screenshot)
2. Scroll to the "+ theme_mods_the-landscaper" link and click on it
3. Check the checkbox of "qt_gallery_maintitle" and scroll to the bottom of the page and click the Apply button (please wait till you see the success message)
4. Navigate back to WPML -> String Translations
5. You will find 2 new rows in the table named "admin_texts_theme_mods_the-landscaper". If you don't see them in the list click on the "All Domains" select field and select them from there
6. If you click on the translations link for each text string the translation fields will appear where you can add your translations.
5. Duplicate a page/post
The WordPress CMS don't have a duplicate or clone function so it is recommended to install the following plugin for that:
After installing and activating the plugin you can duplicate a page or post by clicking the "duplicate" link:
6. Increase the page speed of my WordPress website
To increase the page speed of your WordPress website there are some standard things you can do.
1. Hosting
Hosting is a really important key in the page speed of your website. If you run WordPress on a small shared hosting package it's fine and the theme will fully work but it won't be blazing fast, simply because the resources of shared hosting are limited. If you want a good and fast hosting package we recommend to purchase (managed) VPS hosting.
2. Caching plugin
It's recommend to install a caching plugin for your website. The WP Fastest Cache plugin give the best result for our themes.
After installing navigate to the WP Fastest Cache tab in the admin menu and enable the following settings:
Best is to activate this plugin when you've finished building your website.
3. Scale and compress images
Please make sure you scale and compress images to reduce the size which will result in a faster loading time. You can scale image with an image editor program or with online tools like Pictureresize.
To compress images please use the online Compressor.io tool or install a plugin like Smush Image.
4. Limit the amount of content
Please consider the amount and type of content you add to your website. If you add a lot of large and heavy images (see point 3 for this) your page speed and Google Insights score will drop drastically.
Also adding things like a YouTube video or a Google Maps will also slow down the page speed because a lot of extra scripts from these services will be loaded on your website. Only add content that is really necessary for your website.
5. Limit the amount of plugins
Only use the plugins you really need on your website and don't install too many plugins. If you don't need a plugin simple deactivate and delete it from your website.
If you have plugins activated but you're not using them it is still possible that files from these plugins are loaded to your website which will slow down the page speed of your website.
Please note that the Advanced Custom Fields PRO plugin is required for our themes.
7. Allowed memory size of # bytes exhausted
Do you see an 'allowed memory size exhausted' error? This is one of the most common WordPress errors, and can easily be fixed by increasing the PHP memory limit in WordPress.
Please follow these steps to increase the PHP memory. If you're not familiar with this please ask your hosting provider to increase the PHP memory
8. Configure the theme on HTTPS (SSL certificate)
To serve your website over HTTPS a SSL certificate is needed. If this is not installed on your server yet please get in touch with your hosting provider.
After the SSL certificate is installed there are a few steps to make the WordPress installation and the theme work over HTTPS.
1. Go to Settings -> General
! Important: Before doing step 2 make sure to check if your WordPress dashboard is accessible over HTTPS
2. Change the "WordPress Address" and "Site Address" prefix from HTTP to HTTPS
Check if everything is working correctly on your website. It could be possible that the logo does not show up anymore, in that case delete and re-select the logo in the theme customizer setting.
9. How to update the Advanced Custom Fields PRO plugin?
1. What is this plugin?
The Advanced Custom Fields PRO plugin is used for the slider and page setting option fields in our theme.
2. Update the plugin
If there is no direct update link visible please follow these steps to update the plugin:
Go to the "Plugins" admin tab
Deactivate and delete the Advanced Custom Fields PRO plugin
Go to "Appearance -> Install Plugins"
Install and activate the Advanced Custom Fields PRO plugin
3. Final note
It could be possible that the update notice is still showing up after doing above steps. This means that we need to update the plugin version on our side first.
The best option is to wait or if you want to update this plugin immediately please open a ticket and we send you the latest version.
10. Import the Essential Grid file
The "ess_grid" file is located inside the "extra" folder of the full downloadable theme folder from ThemeForest. To import the file please follow these steps:
1. Please navigate to Ess. Grid -> Import/Export
2. Click on the "Import" panel
3. Upload the "ess_grid.json" file
4. Click the small "Read File" button
5. Click "Import Selected Data" button (please do not click the full demo data button)
The essential-grid file has been uploaded successfully. If the grid is not showing up on your website please follow the steps in this article.
11. Contact form is not working
It could be possible that the contact form don't send the message of the contact form and you will see a red notice below the form after pressing the submit button. This is one of the most common issues with WordPress and contact forms and can be fixed by installing the WP Mail SMTP plugin.
Before installing that plugin please check these steps first:
1. Go to the "Contact" tab in the admin menu and edit your contact form
2. Click on the horizontal "Mail" tab
3. At the "To" setting enter your email address like:
4. At the "From" setting enter the same email address, but wrapped within < > symbols, like:
Please see the screenshot below for step 2, 3 and 4
5. Save the settings and test if the contact form send out the messages successfully.
If the contact form still don't send out the message the mail server of your domain is most likely blocking the requests and a secure connection is needed, this is one of the most common issues with contact forms and WordPress.
You can do this by installing and setting up the WP Mail SMTP plugin. After installing the plugin please follow the steps in the article link below:
12. Change the QT: Featured Page widget image and text
Click on "Pages" admin tab
Edit the page that you want to display with the Featured Page widget
At the right side of the page you can change the "Featured Image"
At the bottom of the page you can change the "Excerpt" (see screenshot to enable this field)
Save the page
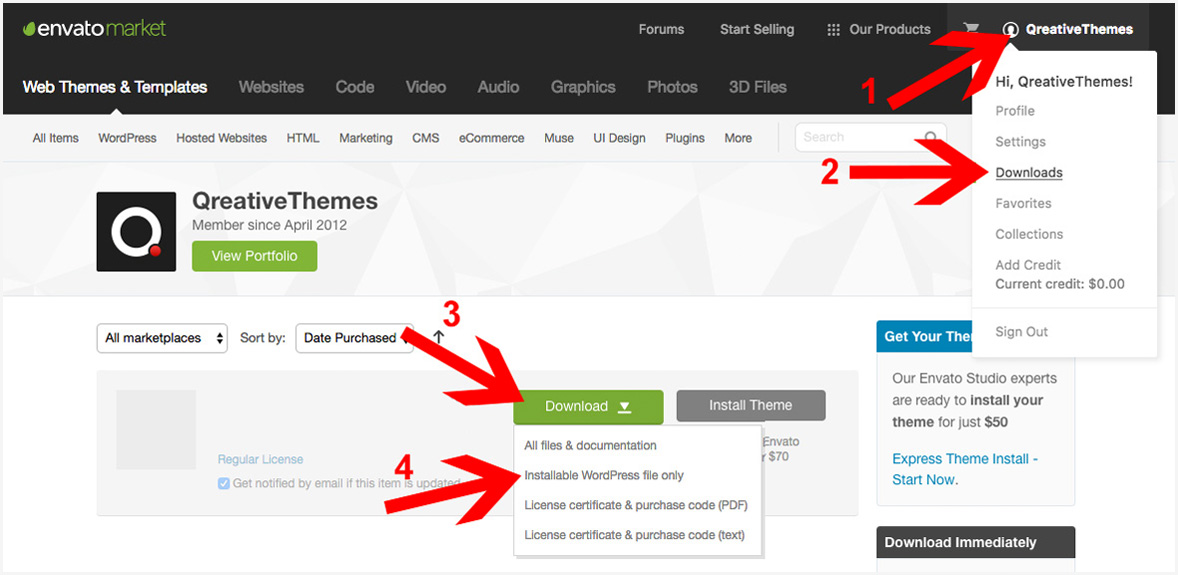
13. How-to: Update the theme
Get the latest theme version
You can download the latest available theme version from the download page of your ThemeForest. Click the "Download" button and select "Installable WordPress files only" for the submenu.
* Before updating the theme it is recommend to create a backup of your website with a plugin like UpdraftPlus.
Follow the steps in this article to setup the plugin
2. WordPress Dashboard
Navigate to Appearance → Themes
Click on "Add New" at the top of the page
Click on "Upload Theme" at the top of the page
Upload the theme .zip file (see screenshot above for the right .zip package)
Click on the blue button to replace the current theme
The theme has been updated
3. FTP Client
Login to your server with a FTP client
Navigate to the theme folder in your WordPress installation (e.g. wordpress/wp-content/themes/)
Rename the folder of the theme you're currently using (e.g. theme-name1 or theme-name2)
Unzip the downloaded zip file and upload the folder to the themes folder on your server
Check if everything is working correctly
If you have any translation files in the old theme folder copy them over to the new theme folder
Remove the old theme folder from your server
The theme has been updated
14. Homepage slider is not visible
If the slider on the homepage is not visible please check the following points:
- Advanced Custom Fields PRO plugin is installed and activated under the Plugin tab. - The "Frontpage Slider" template for the page is selected in the "Page Attributes" metabox
When both points are correct but the slider is still not visible please navigate to the theme folder on your server and check for a duplicated theme folder. You can find the theme folder via:
/wordpress/wp-content/themes/theme-folder/
15. Theme demo images
The images used in our theme demo are coming from a stock photography provider and due to their licensing and copyright of the images we are not allowed to distribute them with the theme.
Below you find a list of all images used in the theme demo that can be purchased from Adobe Stock:
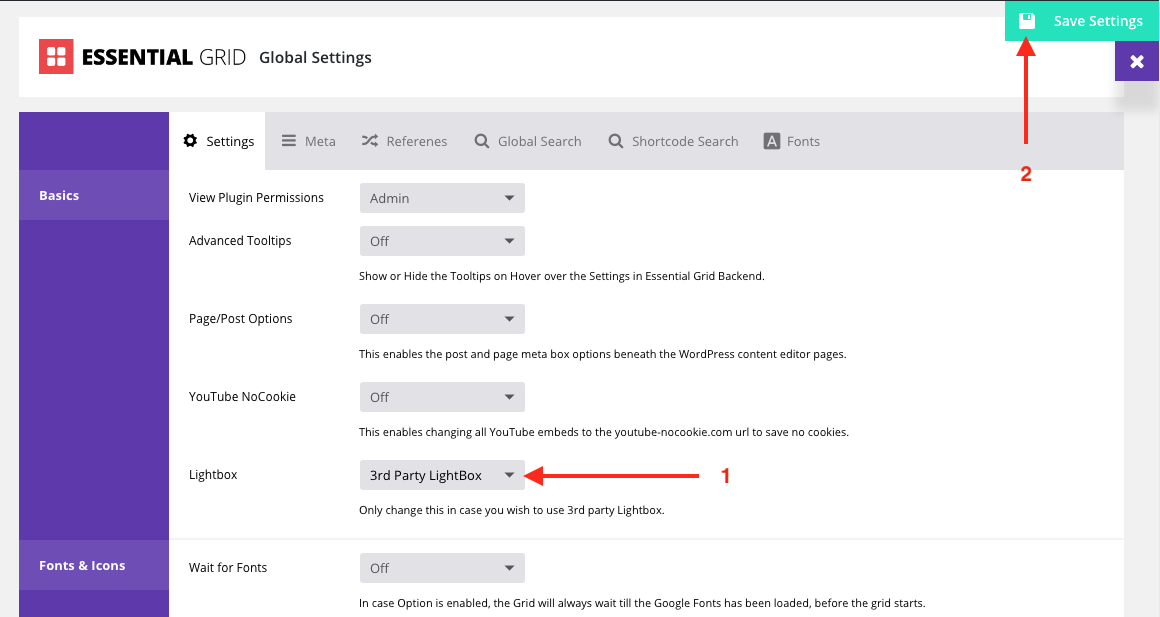
The Essential Grid plugin comes with it's own lightbox functionality and therefore you will see 2 lightbox windows after clicking the image in the lightbox grid.
To remove the duplicated window please follow the steps below:
1. Navigate to Essential Grid ->Global Settings
2. Set the "Lightbox" option to "3rd Party Lightbox"
3. Save the settings
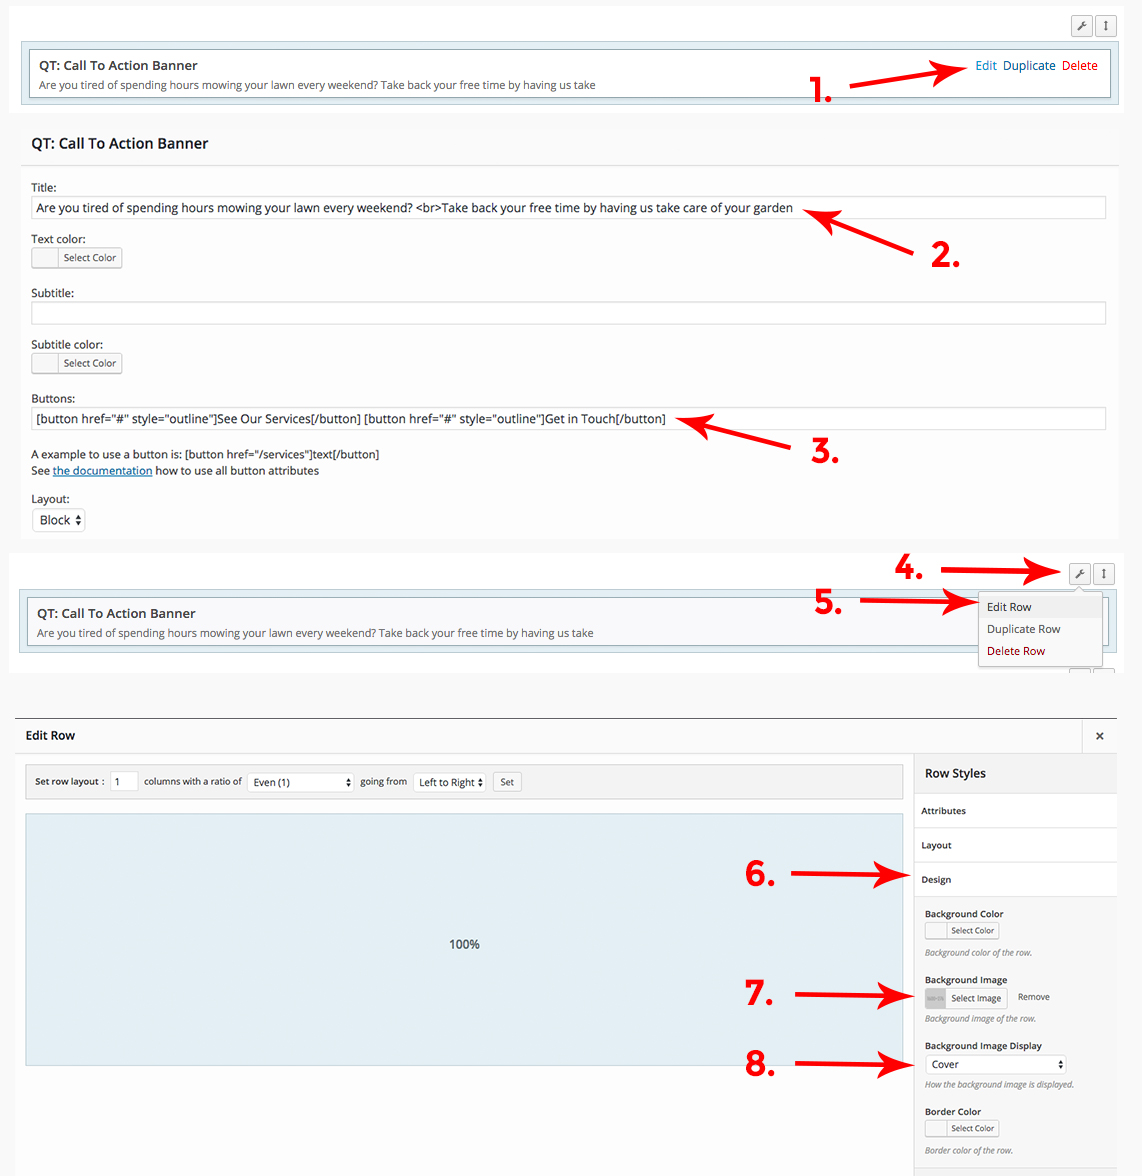
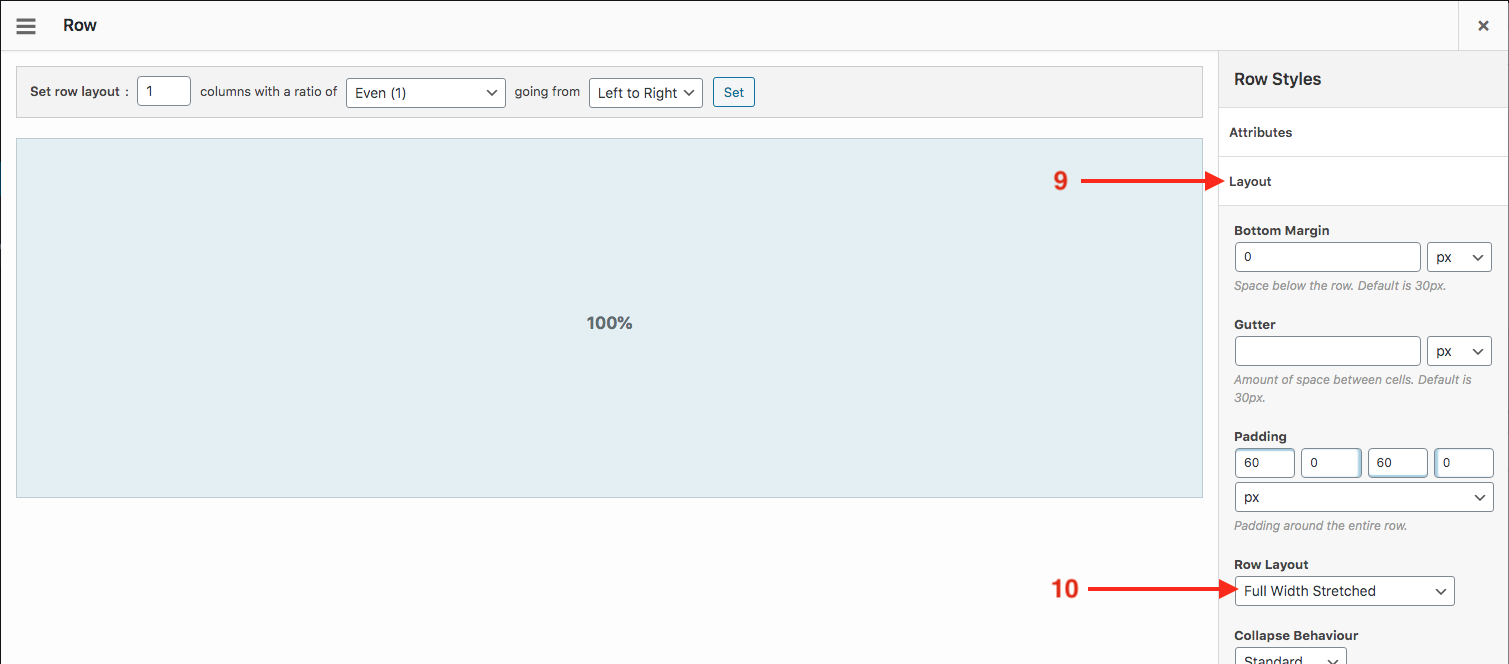
17. How to use the call to action widget
Add the heading and button(s)
1. Click "Edit" to edit the widget 2. Add a title 3. Add a button with the button shortcode
Button shortcode is [button href="http://yourdomain.com"] Text on the button [/button]
Add a background image
4. Hover the wrench icon of the page builder row (not from the widget) 5. Click "Edit Row" 6. Click the "Design" panel 7. Add your background image 8. Set the "Background Image Display" option to "Cover" 9. Click the "Layout' panel 10. Set "Row Layout" option to "Full width stretched"
Click to enlarge the image
Click to enlarge the image
18. Logo does not show up on my site
First make sure you have added a logo image to the logo setting in the theme customizer under Appearance → Customize.
If the logo does not show up on your website please follow these steps:
Go to Settings → General
At the "WordPress Address" and "Site Address" settings change the URL prefix from HTTP to HTTPS
Save the settings at the bottom
Navigate to the logo setting under Appearance → Customize
Delete the logo from the setting(s) and re-select it from the media library
Save the settings
Your logo should be visible at this point.
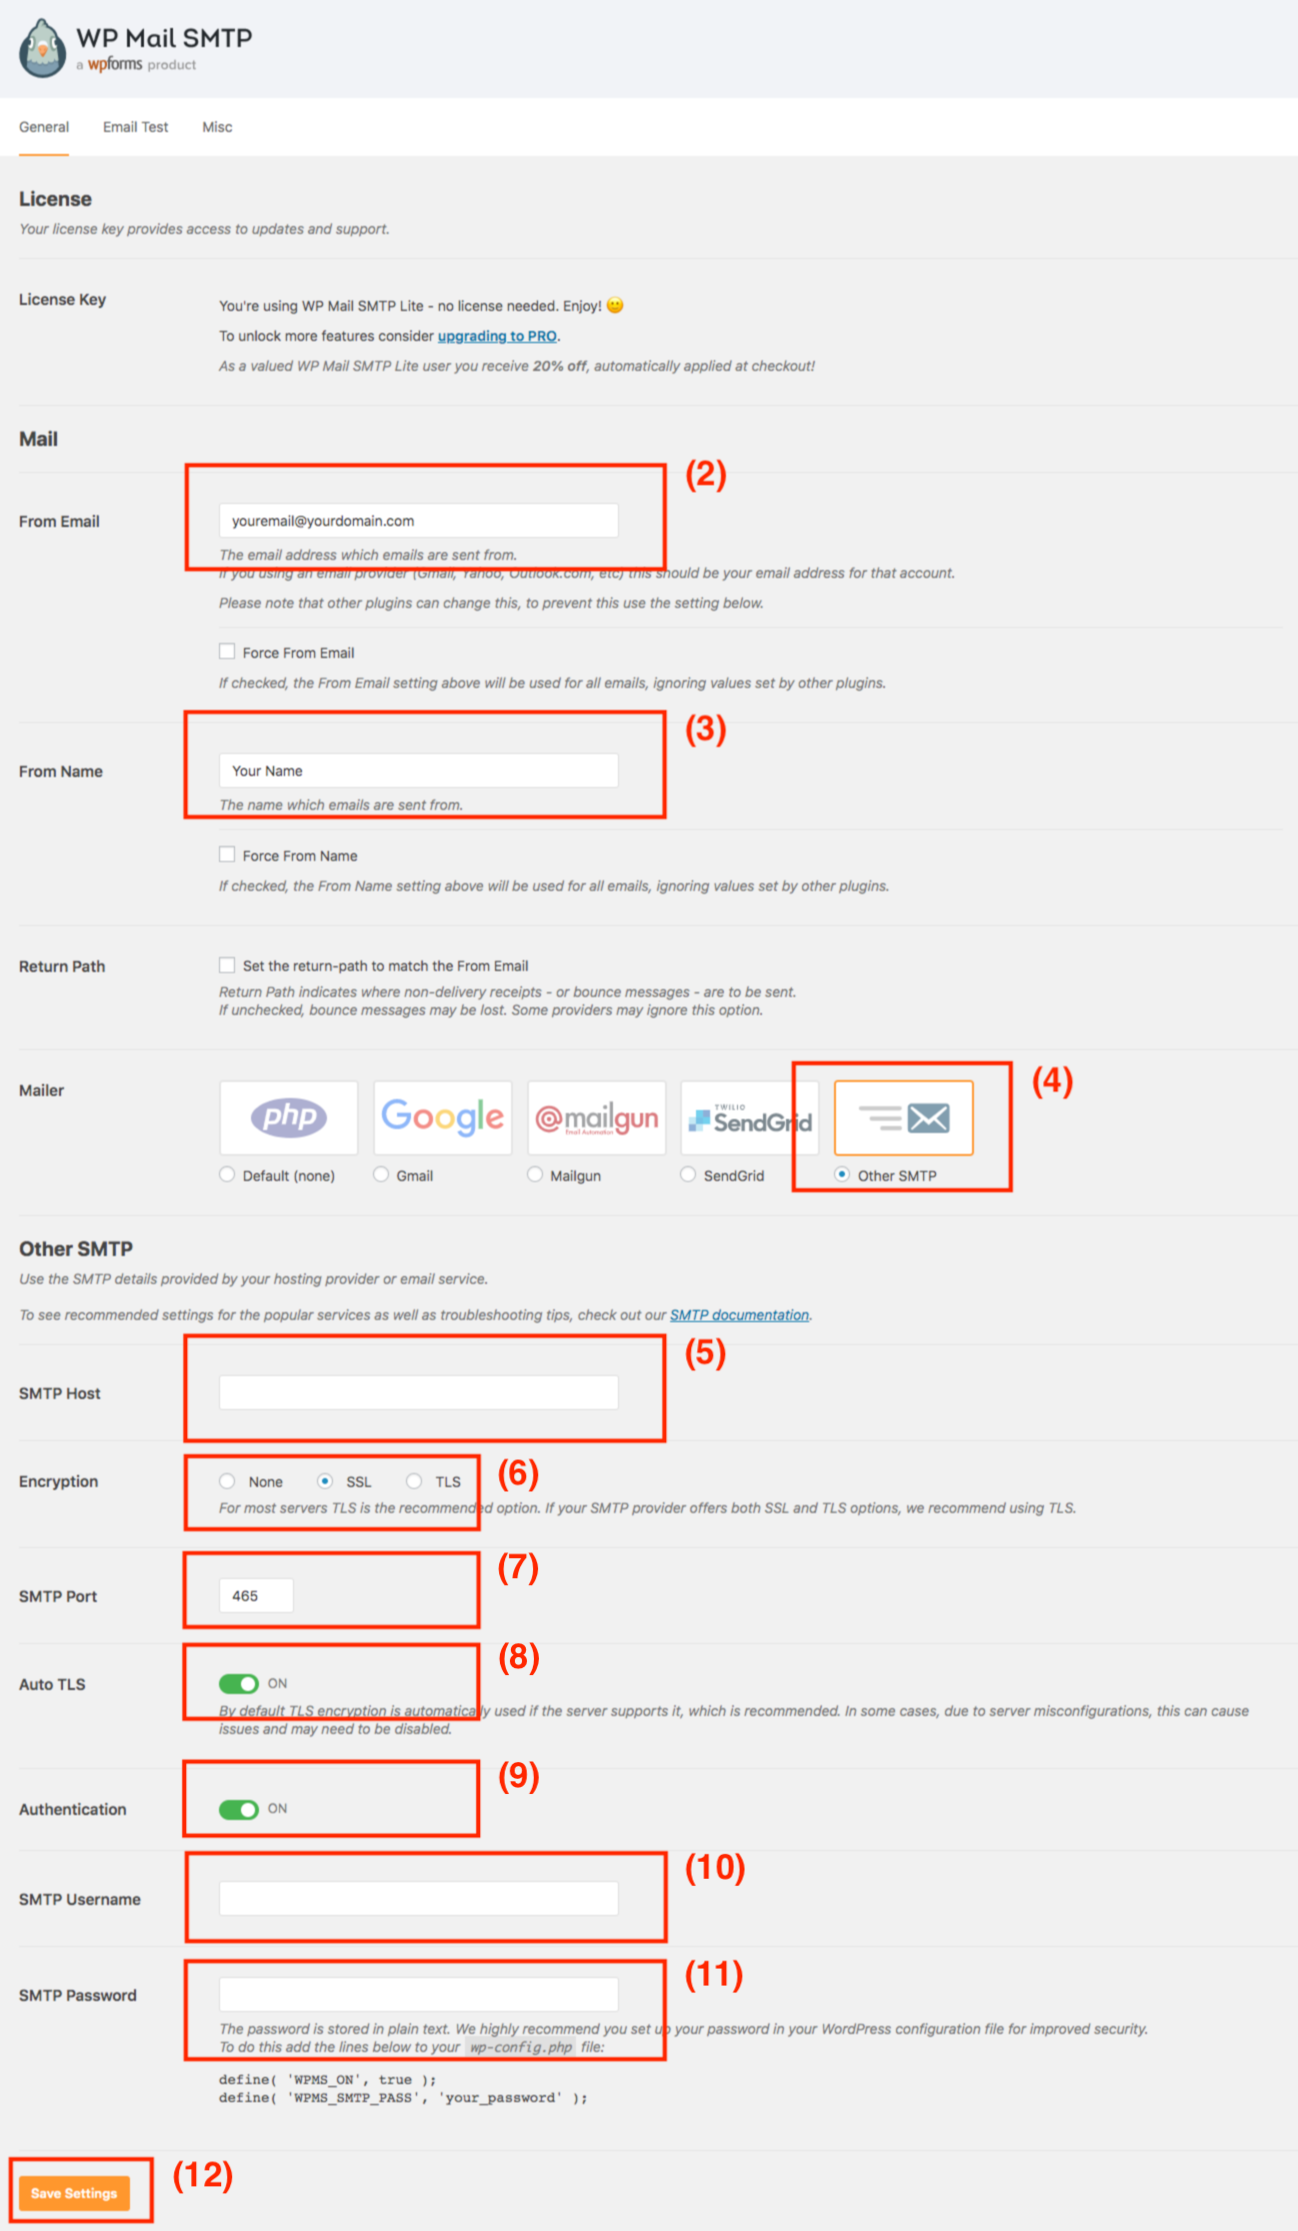
19. Set up the WP Mail SMTP plugin
Before going through the steps make sure you have installed and activated the WP Mail SMTP plugin and have the following details at hand:
- SMTP Host - SMTP Port - SMTP Username (the email address that is used in the contact forms on your website) - SMTP Password (password of above email address)
The SMTP Host and Port details can be found in the email you should have received from your hosting provider.
Configure the WP Mail SMTP plugin (step by step)
1. Navigate to the "WP Mail SMTP" tab in the admin menu
2. At the "From Email" setting enter the email address that you're using in your forms
3. At the "From Name" setting enter the name which emails are sent from
4. Select the "Other SMTP" option
5. Enter the SMTP Host (can be found in an email from your hosting provider)
6. At the "Ecryption" setting select "SSL" (select "TLS" if SSL is not available).
7. Enter the SMTP Port (can be found in an email from your hosting provider)
8. Set the "Auto TLS" setting set to "On"
9. Set the "Authentication" setting to "On"
10. Enter the SMTP Username (the email address you're using in your contact forms)
11. Enter the SMTP Password (the password of the email address)
12. Save the settings
Click to enlarge image
At this point the contact forms should be working. Note that a delay in sending and receiving the message is possible, this depends on the mail server of your domain.
If you still experience any issues please open a support ticket and we are happy to help you.
20. Add video as background in Elementor
In Elementor Page Builder you can add a video (YouTube / MP4) as background on the following way:
Edit your page with Elementor
Add a new page builder row at the top of the page
Edit that new page builder row
At the height setting choose "Min Height"
Change the height value to your own needs
Enable "Stretch Section" setting
Click image below to see step 2 till 6
Click on the "Style" tab
Select the video icon at the background setting
Paste a YouTube video URL in the video link setting
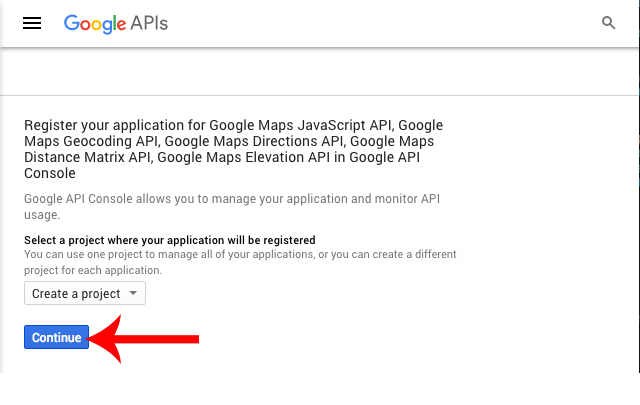
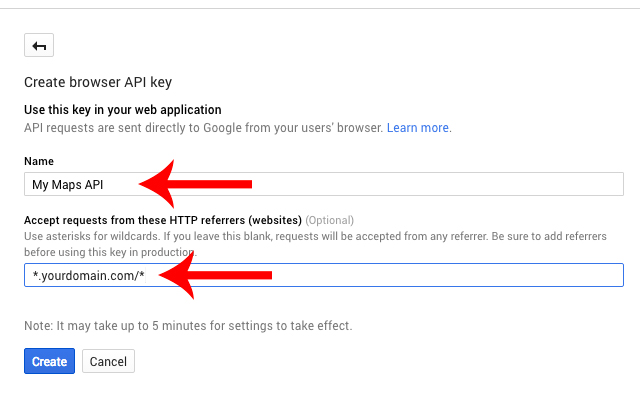
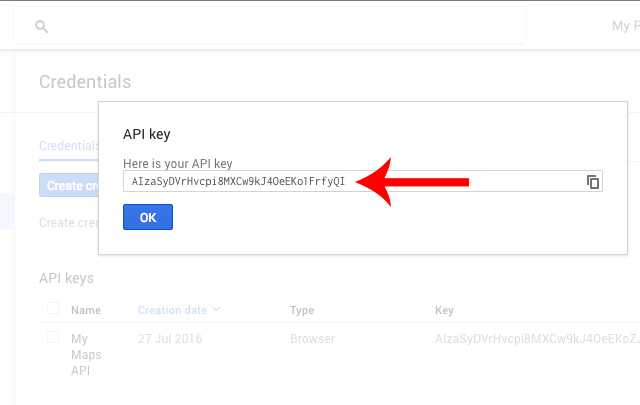
21. How-to: Create Google Maps API key
1. Go to this link and click the "Continue" button (this could take a minute)
2. Enter a name for your key, click "HTTP Referrers", add the URL of your website and click the 'Create' button
Please use the examples below to add your website. Replace yourdomain.com with your domain name. Each in a new input field.
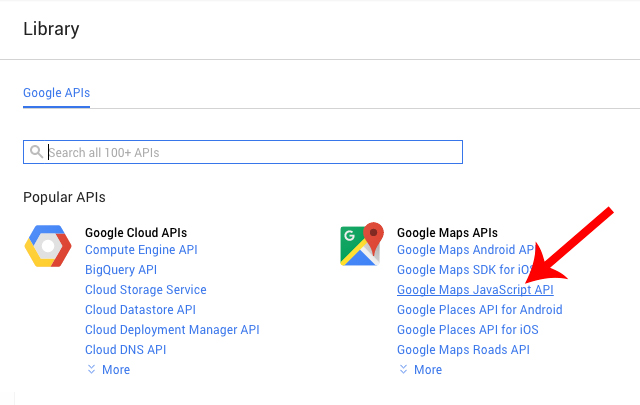
4. Go to the API Manager and click the "Google Maps JavaScript API"
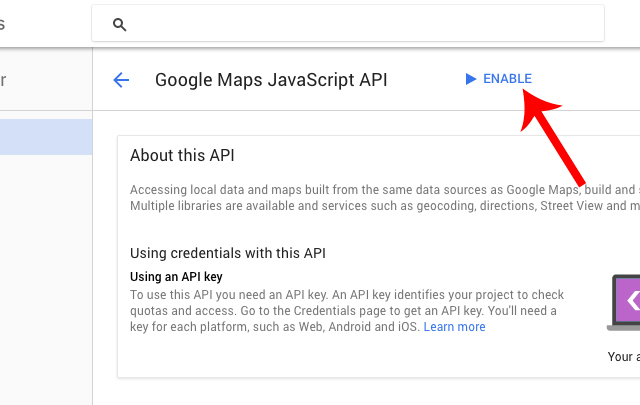
5. Make sure you click the 'Enable' button. If you only see 'Disable' you can leave the page
If you're using the Physio WordPress theme make sure you also enable the:
- Geolocation API - Geocoding API
6. Adding the API key to the theme
- The Landscaper Go to Appearance -> Customize -> Theme Options -> Custom and add the API key to the "Google Maps API" input field
- Physio Edit the SiteOrigin Google Maps widget and add your API key to the "API Key" input field
- The Kleaner Go to Appearance -> Customize -> Google Mapi API key and add your key there
22. How-to: Transfer Theme to Live Server
Please install the Duplicator plugin when you're moving the theme to a live server.
The plugin will generate a zip file of the entire WordPress installation (WordPress, theme, plugins, settings etc.) and installer file. Both files need to be uploaded to the new location on your server.
You can run the install procedure via http://yourdomain.com/installer.php. Please make sure before you're going through the installer you have created a new MySQL user and database. These details need to be entered half way through the install procedure.
When the installer is completed you will see the login link on your screen and the theme is up and running.
23. Add your gallery posts to Essential Grid
1. Add a few posts under the "Gallery" admin tab and make sure all posts have:
- Post title - Featured Image - Gallery Category (not tags)
2. Go to the "Essential Grid" admin tab and click on the purple "Settings" button of the grid you want to edit.
3. Click on "Source" (see image below)
4. Set the "Post Types" setting to "Gallery"
5. At the "Post Categories" setting select all the categories you want to display (hold ctrl button to select multiple)
6. Save the settings in the top right corner
Now all posts from the selected post categories should be visible in the grid.
To add the grid to any page by using the "Essential Grid" widget by using the page builder. Edit the widget and select the right grid you just configured from the dropdown field.
24. Enable lightbox navigation arrows
To enable the navigation arrows for images inside the lightbox window please follow these steps:
Go to Settings -> Media
Make sure you enable images for Fancybox (first setting)
Scroll a bit down to the "Gallery" section
Switch "Autogallery" to "All in one Gallery"
Check the box "Show the gallery navigation arrows"
Save the settings
25. Translate customizer settings with the WPML plugin
Make sure to have the WPML String Translations plugin installed.
--
1. Go to WPML -> String Translations
2. Click the "Translate texts in admin screens" link at the bottom of the page
3. Scroll to the "+ theme_mods_NAME" link and click on it (where NAME is the theme name)
4. Check the checkboxes of the "featured_button_text" and "featured_button_url" settings
5. Scroll to the bottom of the page and click the "Apply" button and wait till you see the success notice.
("featured_button_text" and "featured_button_url" can be replaced with any other setting you want to translate from the customizer)
6. Go to WPML -> String Translations again
7. You'll find 2 new rows in the "admin_texts_theme_mods_NAME" table (where NAME is the theme name).
If you don't see them in the list click on the "All Domains" dropdown field and select the settings from there.
8. Click on the translation link of each new setting and the field to translate will appear.
26. Create alternative menu in page sidebar
By default the service pages use the same page sidebar and menu. In some cases, for example if you have a lot of services to display, you want to use alternative menus on some pages. You can do that by following these steps:
First make sure to set the default sidebar under Settings -> Reading by selecting the "Page Sidebar" at the "Default Sidebar" setting.
1. Create a new menu
Go to Appearance -> Menus
Click the "Create a new menu" link":
Enter a logical name for this menu
Add the links your would like to show in this menu
Save the menu
2. Create a new sidebar location for a page
Go the the "Pages" admin tab
Edit the page where you want to show the different sidebar menu
On the right side at the sidebar field click on "Enter New":
Enter a logical name for this sidebar, or the same you've used for the menu
Click the "Update" button below the field
Save the page
If you want to display this same custom page sidebar on another page you don't have to create a new one. You can simple choose the already created custom sidebar from the dropdown field above the "enter new" link.
3. Assign the menu to this new sidebar location
Go to Appearance -> Widgets
Add a "Navigation" widget to the new created sidebar panel
Edit the navigation widget and select your new created menu from the dropdown field.
Now your new menu should be displayed in the sidebar of the page.